Using Nmap to discover open ports and OpenSSL to identify the right one and why the credential this level returns is a private key instead of a password.
Introduction
Day 16. Bandit Level 16 to Level 17. The previous two levels had a port number handed to you. This one does not. There is a range of one thousand ports on localhost and only one of them will give you what you need. Several of them speak SSL/TLS. Several do not. One of the SSL-speaking ones returns the credential. The rest echo whatever you send. Finding the right one requires knowing how to scan a port range and identify services before attempting a connection.
This level introduces Nmap for local port discovery and adds a significant twist to what has come before: the credential returned is not a password. It is an RSA private key. Knowing what to do with that output and why it is more valuable than a password string is the final lesson this level teaches.
By the end of this article you will know how to scan a port range for open services, identify which ones speak SSL/TLS and use that information to connect to the right one with openssl s_client.
Level Objective
The credentials for the next level can be retrieved by submitting the password of the current level to a port on localhost in the range 31000 to 32000. First find out which of these ports have a server listening on them. Then find out which of those speak SSL/TLS and which don’t. There is only 1 server that will give the next credentials, the others will simply send back to you whatever you send to it. The commands suggested include nmap, openssl, s_client, netstat and ss.
Approach
I connected from my local Kali machine using the password from the previous level:
ssh bandit16@bandit.labs.overthewire.org -p 2220
The full Bandit ASCII art banner loaded and the prompt changed to bandit16@bandit:~$.
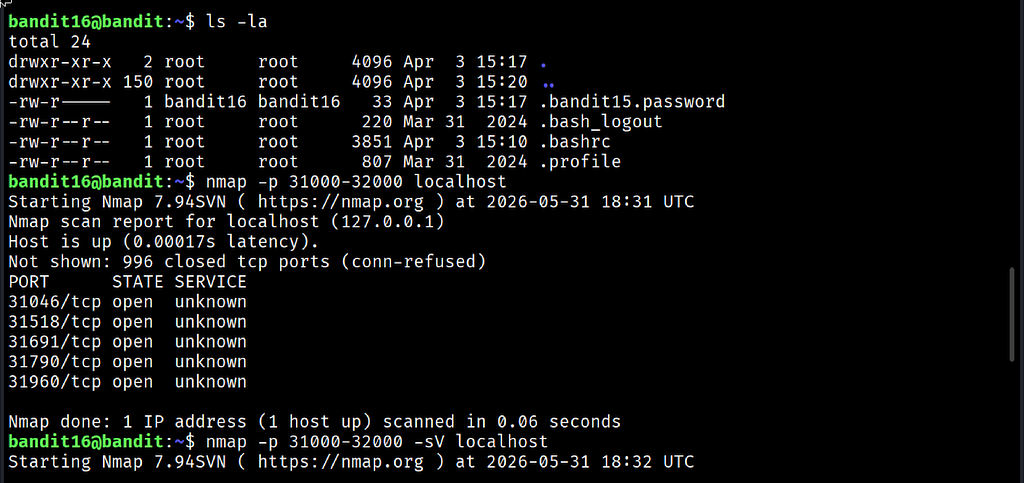
I ran ls -la first. A hidden file called .bandit15.password was present in the home directory owned by bandit16 with permissions -rw-r-----. That confirmed the previous level's password was stored locally for reference.
The next step was identifying which ports in the range 31000 to 32000 had services listening. I ran Nmap across the full range:
nmap -p 31000-32000 localhost
The scan completed in 0.06 seconds and returned five open ports: 31046, 31518, 31691, 31790 and 31960. The remaining 995 ports in the range were closed.
To identify which of those five spoke SSL/TLS I ran Nmap again with service version detection enabled:
nmap -p 31000-32000 -sV localhost
The version scan identified which ports were running SSL services. Port 31790 was the target. I connected using openssl s_client with the -quiet flag to suppress the verbose SSL handshake output:
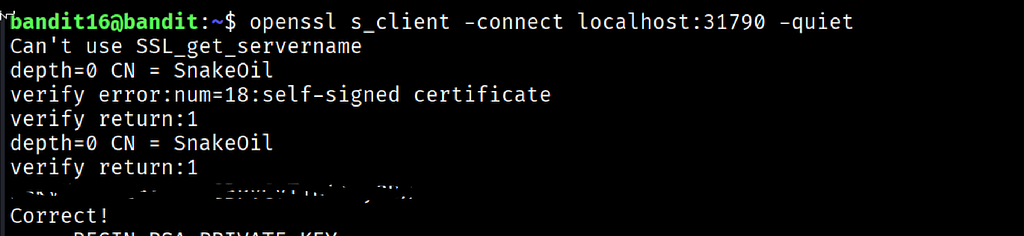
openssl s_client -connect localhost:31790 -quiet
The connection established with a self-signed certificate. The certificate CN showed SnakeOil, which is expected on the Bandit game server. I submitted the current password:
kSkvUpMQ7lBYyCM4GB....................
The server responded with Correct! followed by a complete RSA private key block. This is the credential for Level 17. It is not a password. It is the private key that authenticates directly to bandit17 using SSH key-based login.
Commands Used
# Connect to the Bandit server as bandit16 using the Level 16 password
ssh bandit16@bandit.labs.overthewire.org -p 2220
# Check the home directory for any useful files
ls -la
# Scan the port range to find open services
nmap -p 31000-32000 localhost
# Run a service version scan to identify which open ports speak SSL/TLS
nmap -p 31000-32000 -sV localhost
# Connect to the identified SSL port and submit the current password
openssl s_client -connect localhost:31790 -quiet
Command Breakdown
nmap -p 31000-32000 localhost Scans every port in the specified range on the local machine and reports which ones are open and accepting connections. The -p flag defines the port range. This first scan is fast and gives a short list of ports worth investigating further.
nmap -p 31000-32000 -sV localhost Adds service version detection to the scan. The -sV flag sends probes to each open port and attempts to identify what application and protocol is running. This is what separates the SSL-speaking ports from the plain TCP ones. The port that returns SSL details is the one to target.
openssl s_client -connect localhost:31790 -quiet Establishes an SSL/TLS encrypted connection to port 31790. The -quiet flag suppresses the verbose SSL handshake output and shows only the essential connection details. The CN = SnakeOil in the certificate confirms this is the game server's self-signed certificate.
CN = SnakeOil The Common Name field in the server certificate. On the Bandit game server this is a placeholder name for the self-signed certificate. In a real investigation a CN like this on a certificate for a production service would be worth flagging.
RSA private key response Instead of a plain password string the server returned a complete RSA private key. This key is the credential for bandit17 and must be saved to a file on the local machine, given correct permissions and used with ssh -i exactly as in Day 13.
Lesson Learned
The main technical takeaway is the two-step Nmap approach: first scan to find open ports, then scan with version detection to identify what they are running. Jumping straight to connecting ports one by one without scanning first is inefficient and misses the structure of the problem entirely.
The other significant lesson is recognising that credentials are not always passwords. An RSA private key returned as a server response is a credential that grants access through key-based authentication. Knowing to save it, set chmod 600 and use it with ssh -i is built directly on what was learned in Day 13. The series compounds its own skills.
The .bandit15.password hidden file in the home directory is also worth noting. It confirms a pattern across the Bandit levels: previous passwords are sometimes stored locally for reference. Running ls -la immediately after login continues to surface useful information.
- nmap -p range localhost — scan a port range on the local machine for open services
- nmap -p range -sV localhost — identify services and protocols running on open ports
- openssl s_client -connect host:port -quiet — connect with SSL and suppress verbose output
- chmod 600 keyfile — set correct permissions on a retrieved private key before use
- ssh -i keyfile user@host -p PORT — authenticate using a saved private key
🔴 SOC Analyst Insight
Port scanning is a core technique in both offensive and defensive security work. During an internal network investigation an analyst might need to identify which services are running on a host without access to asset documentation. Nmap with service version detection provides a fast, reliable map of what a machine is exposing and what protocols it is speaking.
# Scan a suspected compromised host for open ports and identify running services
nmap -p 1-65535 -sV 192.168.10.45 2>/dev/null | grep "open"
The command above performs a full port scan with service detection on a target host and filters the output to show only open ports. During host triage after a suspected intrusion, unexpected open ports are an immediate investigation priority. A service listening on an unusual port that was not there before the incident could indicate an attacker-installed backdoor, a reverse shell listener or a data exfiltration channel. Nmap finds it. The analyst investigates it.
Key Takeaway
This level combined three skills into one workflow: port scanning to find open services, service detection to identify the right protocol and SSL connection to submit the credential. The credential returned was a private key rather than a password, requiring the additional steps of saving it and setting correct permissions before use. Each of those steps was covered in earlier levels of this series. Day 16 is the first level that tested whether all of those skills could be combined correctly under one challenge. They can.
30-Day Cybersecurity Learning Journey — Progress
🟢 Open Day — Setup & Series Introduction  | OverTheWire Bandit
✅ Day 0.   — Bandit Level 0               | First Login
✅ Day 1.   — Bandit Level 1 → 2           | Special Characters
✅ Day 2.   — Bandit Level 2 → 3           | Spaces in Filenames
✅ Day 3.   — Bandit Level 3 → 4           | Hidden Files
✅ Day 4.   — Bandit Level 4 → 5           | File Types
✅ Day 5.   — Bandit Level 5 → 6           | find with Properties
✅ Day 6.   — Bandit Level 6 → 7           | find across Filesystem
✅ Day 7.   — Bandit Level 7 → 8           | grep
✅ Day 8.   — Bandit Level 8 → 9           | sort and uniq
✅ Day 9.   — Bandit Level 9 → 10          | strings and grep
✅ Day 10.  — Bandit Level 10 → 11         | base64
✅ Day 11.  — Bandit Level 11 → 12         | ROT13 and tr
✅ Day 12.  — Bandit Level 12 → 13         | hexdump and compression
✅ Day 13.  — Bandit Level 13 → 14         | SSH keys
✅ Day 14.  — Bandit Level 14 → 15         | Netcat
✅ Day 15.  — Bandit Level 15 → 16         | SSL and OpenSSL
✅ Day 16.  — Bandit Level 16 → 17         | Port Scanning  ← today
⬜ Day 17.  — Bandit Level 17 → 18         | coming next
Follow along with the series as I document each level, command and lesson learned.
Scanning before connecting is not caution. It is the correct first step every time.
OverTheWire Bandit Walkthrough — Level 16 → 17 | 30-Day Cybersecurity Learning Journey (Day 16) was originally published in System Weakness on Medium, where people are continuing the conversation by highlighting and responding to this story.