OverTheWire Bandit Walkthrough — Level 6 → 7 | 30-Day Cybersecurity Learning Journey (Day 6)
Searching the entire Linux file system by ownership and size and why combining find filters with stderr redirection is what turns a noisy system-wide search into a clean, actionable result.
Introduction
Day 6. Bandit Level 6 to Level 7. The previous level searched one directory tree with a known starting point. This level removes that safety net entirely. The file could be anywhere on the server. The home directory is empty. There are no obvious clues about where to look. The only information available is who owns the file and how large it is.
This level introduces two things that work together. The first is using find with ownership filters to search by user and group across the entire file system. The second is stderr redirection, a technique that silences the flood of permission errors that system-wide searches generate, so that the one result you actually need is not buried under hundreds of lines of noise.
By the end of this article you will know how to search an entire Linux system by file ownership and how to make that search produce clean, readable output regardless of what the system throws back at you.
Level Objective
According to the official OverTheWire Bandit page, the password for the next level is stored somewhere on the server and has three specific properties: it is owned by user bandit7, owned by group bandit6 and 33 bytes in size. Unlike the previous levels, there is no starting directory. The search begins from the root of the entire file system.
Approach
I logged in using the password retrieved from the previous level:
ssh bandit6@bandit.labs.overthewire.org -p 2220
The banner loaded and ended with “Enjoy your stay!” and the prompt changed to bandit6@bandit:~$.
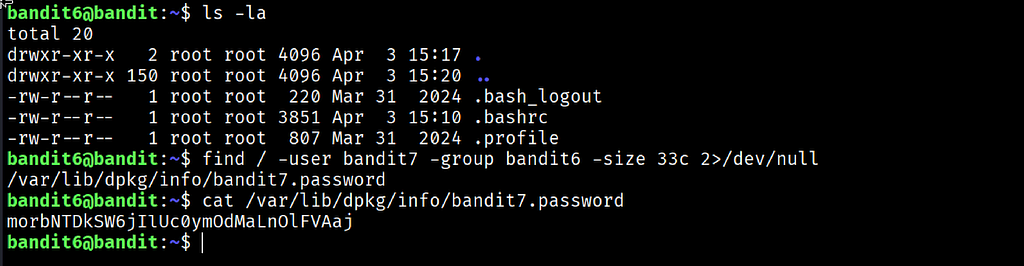
I ran ls -la on the home directory first. The result confirmed there was nothing useful there. Only standard system files. The file was somewhere else on the server entirely.
I built a find command starting from / to search the whole file system. I added the user ownership filter, the group ownership filter and the size filter. The 2>/dev/null at the end was essential to silence the permission errors:
find / -user bandit7 -group bandit6 -size 33c 2>/dev/null
One clean result came back immediately: /var/lib/dpkg/info/bandit7.password. I read it directly:
cat /var/lib/dpkg/info/bandit7.password
The password printed to the terminal.
Commands Used
# Connect to the Bandit server as bandit6 using the Level 6 password
ssh bandit6@bandit.labs.overthewire.org -p 2220
# Confirm the home directory is empty before deciding on an approach
ls -la
# Search the entire file system for a file matching all three ownership and size properties
find / -user bandit7 -group bandit6 -size 33c 2>/dev/null
# Read the file returned by the find command
cat /var/lib/dpkg/info/bandit7.password
Command Breakdown
find / Starts the search from the root of the file system and works recursively through every directory on the entire server. This is the broadest possible scope for a find command and the correct starting point when you have no idea where the file is located.
-user bandit7 Filters results to files where the user owner is set to bandit7. Linux records ownership for every file and this filter matches against that user field precisely.
-group bandit6 Filters results to files where the group owner is set to bandit6. A file can have a different user owner and group owner at the same time and this filter targets the group field specifically.
-size 33c Matches files that are exactly 33 bytes in size. The c suffix specifies bytes as the unit of measurement. Without it find uses 512-byte blocks by default which would return wrong results.
2>/dev/null Redirects stderr (standard error, file descriptor 2) to /dev/null, which is a special file that discards everything written to it. A system-wide find generates hundreds of "Permission denied" errors when it hits directories the current user cannot access. Without this redirect those errors completely bury the one result that matters. Only stdout remains visible, which is where the matching file path appears.
Lesson Learned
The main technical takeaway is that a system-wide find without stderr redirection is nearly useless in practice. The volume of permission errors on a real Linux server is so large that any meaningful output is impossible to spot without scrolling through hundreds of irrelevant lines. Learning to redirect stderr and separate it from stdout is just as important as knowing how to build the search itself.
What clicked during this level was how precise the ownership filters were. User, group and size combined to return exactly one result from an entire server. That is the power of stacking filters: each one narrows the result set further until only the answer remains.
The empty home directory was also a deliberate signal. Running ls -la immediately after login and finding nothing useful confirmed that the normal approach of looking in the current directory would not work here. That observation drove the decision to search the whole system rather than wasting time exploring directories manually.
- find / -user username — search the entire system for files owned by a specific user
- find / -group groupname — search the entire system for files owned by a specific group
- 2>/dev/null — redirect stderr to suppress error messages from any command
- find / -type f -size 33c — search the entire system for files of an exact byte size
- 1>/dev/null — redirect stdout to suppress normal output when only errors are needed
🔴 SOC Analyst Insight
Searching a Linux system by file ownership is a standard technique during post-compromise investigation. When an attacker gains access to a system they often create files under the account they compromised. Knowing which user account was involved and searching for files owned by that account across the entire file system can surface attacker tooling, dropped payloads and exfiltration staging files that would never appear in a targeted directory search.
# Search the entire system for files owned by a compromised service account modified recently
find / -type f -user www-data -newer /var/log/auth.log 2>/dev/null
The command above looks for files owned by www-data, a common target in web server compromises, that were created or modified after the authentication log timestamp. The stderr redirect keeps the output clean regardless of how many restricted directories the search passes through. Running this kind of ownership-scoped search early in a triage gives an analyst a fast picture of where activity has occurred on the file system without manually opening directories one by one.
Key Takeaway
A system-wide file search is only as useful as its output is readable. Combining ownership filters with stderr redirection turns find from a noisy, overwhelming command into a precision investigative tool. Knowing how to search an entire Linux file system by user, group and size and knowing how to suppress the errors that come with it are skills that belong together. One without the other produces output no one can use.
30-Day Cybersecurity Learning Journey — Progress
🟢 Open Day — Setup & Series Introduction  | OverTheWire Bandit
✅ Day 0.   — Bandit Level 0               | First Login
✅ Day 1.   — Bandit Level 1 → 2           | Special Characters
✅ Day 2.   — Bandit Level 2 → 3           | Spaces in Filenames
✅ Day 3.   — Bandit Level 3 → 4           | Hidden Files
✅ Day 4.   — Bandit Level 4 → 5           | File Types
✅ Day 5.   — Bandit Level 5 → 6           | find with Properties
✅ Day 6.   — Bandit Level 6 → 7           | find across Filesystem  ← today
⬜ Day 7.   — Bandit Level 7 → 8           | coming next
Follow along with the series as I document each level, command and lesson learned.
The file system will always generate noise. The skill is knowing how to silence it and read what remains.
OverTheWire Bandit Walkthrough — Level 6 → 7 | 30-Day Cybersecurity Learning Journey (Day 6) was originally published in System Weakness on Medium, where people are continuing the conversation by highlighting and responding to this story.